Practical Codeigniter 3 Pdf Free Download
Oct 12, 2021
Domantas G.
8min Read
CodeIgniter Tutorial

Are you looking for a complete CodeIgniter tutorial? If so, this article is for you! We'll show you how to install, configure, and use CodeIgniter to build a PHP web application.
In addition, you are going to learn about the MVC (Model-View-Controller) and its importance in modern web development.
What is CodeIgniter?
CodeIgniter is an open-source web framework for PHP. It provides lots of libraries and packages, so you won't have to build web applications and web pages from scratch.
This PHP framework also adds layers of logic to your web applications. Thanks to its MVC (Model-View-Controller) architecture, you can build a cleaner design and parallelize certain processes in the development cycle. We'll talk more about this later.
To install CodeIgniter, you need to have SSH access to your shared hosting or VPS. You can use PuTTY (Windows) or the built-in terminal shell (Linux and macOS).
Without further ado, let's start this CodeIgniter tutorial.
How to Install CodeIgniter
CodeIgniter installation requires a LAMP environment.
This application stack is already available on Hostinger shared hosting. However, if you are using VPS, you might want to learn how to install LAMP on Ubuntu or CentOS.
Once everything is ready, you can follow these steps:
- Connect to your hosting account via SSH. Then, navigate to the public_html folder by typing:
cd /public_html
- Download the latest distribution of CodeIgniter with this command:
wget https://github.com/bcit-ci/CodeIgniter/archive/3.1.11.zip
In this CodeIgniter tutorial, the latest stable release is 3.1.11. You can visit the official page to see if a newer version has come out.
- If you are using Hostinger shared hosting, you can directly unzip CodeIgniter file by entering the following command:
unzip 3.1.11.zip
Unfortunately, zip might not be preinstalled on VPS. Therefore, you should install it before executing the above command:
sudo apt-get install zip
- You will see a directory named CodeIgniter-3.1.11. We suggest that you rename this folder for convenience:
mv /var/www/CodeIgniter-3.1.11 /var/www/codeigniter
- Open your browser and enter the path of the said folder:
https://yourdomain.com/codeigniter
You should see CodeIgniter's default welcome screen, which means the framework has been successfully installed on your system.
How to Configure CodeIgniter
In this part of CodeIgniter tutorial, you will learn how to configure the framework on shared hosting and VPS. For the users of the latter, we are also going to explain how to create a virtual host for this PHP framework.
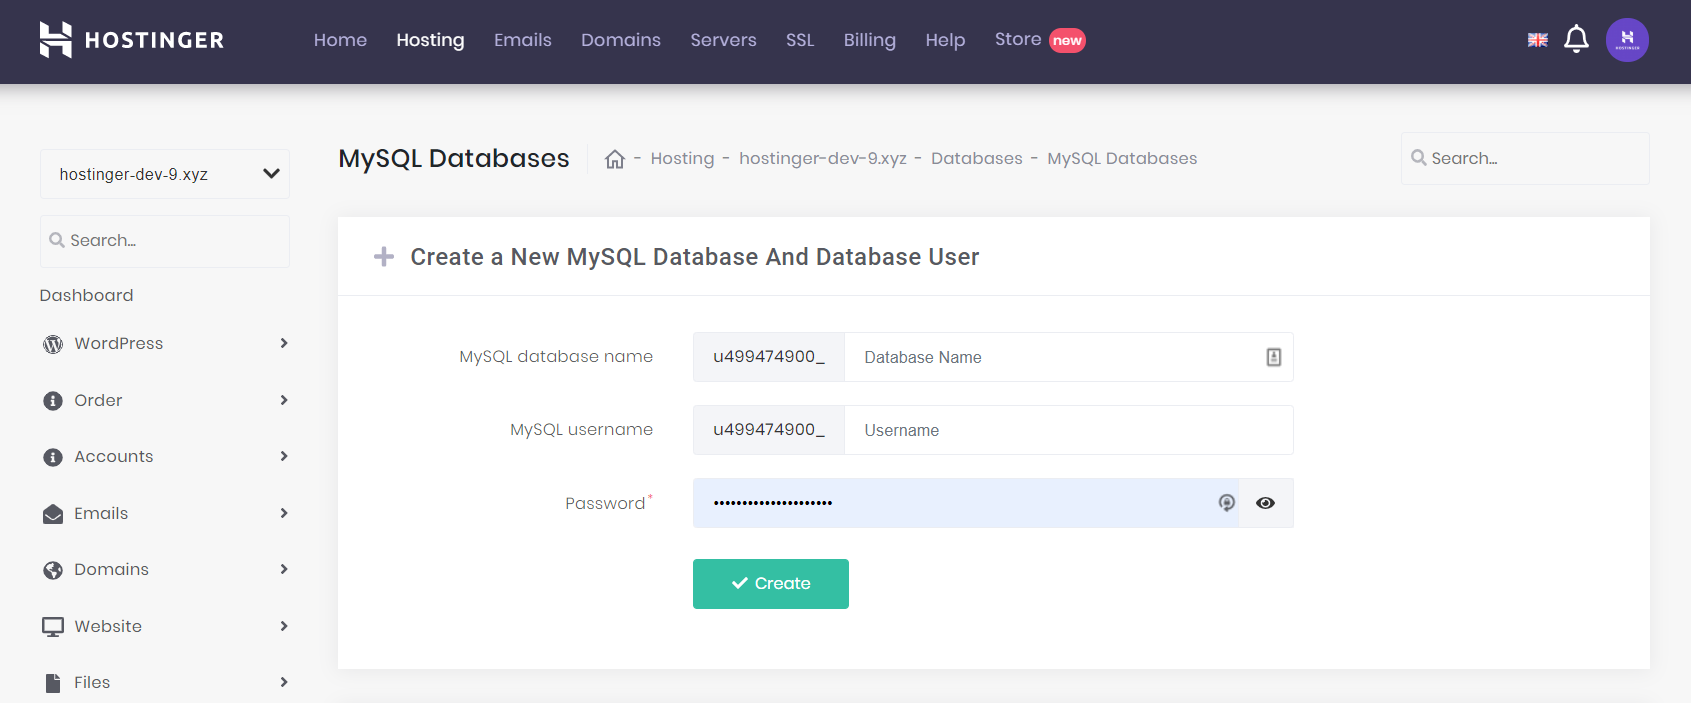
First thing first, we need to create a new MySQL database:
- On Hostinger's hPanel, go to the Databases section and select MySQL database. Enter your database name and username and then hit Create.
- Login to your hosting account via SSH and open the database.php file in the CodeIgniter distribution:
nano /codeigniter/application/config/database.php
- Locate the following section of the file and replace the details with your newly-created database information (username, password, database). The rest of the values should be similar to this example:
$db['default']['hostname'] = 'mysql.hostinger.com'; $db['default']['username'] = 'u499474900_user'; $db['default']['password'] = 'password'; $db['default']['database'] = 'u499474900_database'; $db['default']['dbdriver'] = 'mysql'; $db['default']['dbprefix'] = ''; $db['default']['pconnect'] = TRUE; $db['default']['db_debug'] = TRUE; $db['default']['cache_on'] = FALSE; $db['default']['cachedir'] = ''; $db['default']['char_set'] = 'utf8'; $db['default']['dbcollat'] = 'utf8_general_ci'; $db['default']['swap_pre'] = ''; $db['default']['autoinit'] = TRUE; $db['default']['stricton'] = FALSE;
Save the file by pressing CTRL + X and enter Y to confirm the changes.
- Set up your domain name by modifying CodeIgniter's config.php file. Simply enter this command:
nano codeigniter/application/config.php
- Find the following line:
$config['base_url'] = 'http://yourdomain.com';
Change the value to your real domain name. After that, save the file by typing CTRL + X and then Y.
Now you have successfully synced your database with CodeIgniter!
Configuring Virtual Hosts on VPS
Skip this part if you are installing CodeIgniter on Hostinger shared hosting.
VPS users have the option to run multiple CodeIgniter applications on a single domain name. In order to do so, we need to configure virtual hosts and change CodeIgniter configurations.
- Ensure that your document root is synced with the installation directory of CodeIgniter. You can do this by opening the virtual host file:
sudo nano /etc/apache2/sites-enabled/000-default
- Look for the following block:
<VirtualHost *:80> DocumentRoot /path/to/codeigniter [.......] <VirtualHost *:80>
- Change /path/to/codeigniter with the real path of your CodeIgniter installation directory. By doing this, all your URLs will point to this folder. Save the changes by pressing CTRL + X and Y.
Congratulations, you have successfully created a new virtual host! Now, for a more efficient development process, we need to get rid of index.php from CodeIgniter's URL format.
- Open the config.php file:
nano codeigniter/application/config/config.php
Replace the following line:
$config['index_page'] = 'index.php';
With this:
$config['index_page'] = '';
- To ensure that you won't get any errors, you have to re-route future requests by modifying the .htaccess file. But first, you need to check whether mod_rewrite is enabled:
apache2ctl -M
The above command will output the capabilities of the server. If you find mod_rewrite on the list, continue to the next step. If not, execute this line:
a2enmod rewrite
Then, restart Apache:
sudo service apache2 restart
- Create a .htaccess file in the root folder of CodeIgniter:
nano codeigniter/.htaccess
- Paste the following lines to the file. Save and exit.
RewriteEngine on RewriteCond %{REQUEST_FILENAME} !-f RewriteCond %{REQUEST_FILENAME} !-d RewriteRule .* index.php?/$0 [PT,L] - Let Apache know that it should look for the newly-created .htaccess file. To achieve this, open the virtual host file again:
sudo nano /etc/apache2/sites-enabled/000-default
Ensure that AllowOverride is set to All, as shown below:
<Directory> Options Indexes FollowSymLinks MultiViews AllowOverride All Order allow,deny allow from all </Directory>
After it's confirmed, save the file.
If done correctly, you won't see the pesky index.php again and your URL will look cleaner.
Understanding MVC
Before we continue our CodeIgniter tutorial and learn how to build an application with the framework, you must have a basic understanding of MVC and its concepts.
Simply put, MVC is a web development architecture paradigm. It recommends that the business logic in any application should be separated from the presentation.
MVC will divide an application into three functional parts:
- Models — deals with your database, carries out computations, and more. In short, it is where your business logic is located.
- Views — forms the presentation layer of the application, where the data from your models are embedded.
- Controllers — used to connect models and views. A controller will route user requests to the appropriate model. After that, once the model has done its job, the controller loads the relevant view.
This architectural pattern also gives developers the flexibility to reuse code for multiple views. For example, you can apply the same navigation bar on every webpage of your application.
Moreover, as both views and models are entirely separate, the front-end developers can work in parallel with the back-end team to speed up the development process.
Note that CodeIgniter also subscribes to Object-Oriented Programming (OOP). As such, models and controllers are PHP classes that extend the base classes provided by the framework.
Views are also called PHP files, but the bulk of their content is HTML/CSS. Only a few snippets of PHP code are present, which are used to display the data from models.
Routing Basics
This is how CodeIgniter formats its URL strings:
<base_url>/index.php/<controller_name>/<controller_function>/<function_parameter_1>/>/<function_parameter_2>…
In the previous section, we have shown you how to remove index.php from the format. As a result, your URL should be similar to this example:
http://www.yourdomain.com/welcome/tester/1
Here, welcome is a controller class that corresponds to a controller file named welcome.php. This class will call the tester() function, and pass '1' as a parameter. More parameters can be supplied in a similar fashion, separated by slashes.
As you can see, routing is effortless in CodeIgniter. You can play around and create more complex routing.
Libraries
CodeIgniter encourages you to reuse existing libraries and helper functions to perform common tasks.
The framework also allows you to decide which library to load and when to load them. This on-demand process results in fast, lightweight, and feature-rich applications.
Loading a library is easy in CodeIgniter. For instance, to load the Database library, simply pass the following line in your model or controller:
$this->load->database();
However, we suggest that you autoload common libraries and helpers at the application startup, so they'll be ready whenever you need them. Examples include Database library and URL helper function.
Follow these steps to autoload libraries and helpers:
- Open the autoload file:
nano application/config/autoload.php
- Change the autoload value:
- To autoload the Database library, replace the following line:
$autoload['libraries'] = array();
With this:
$autoload['libraries'] = array('database'); - To autoload URL helpers, replace the following line:
$autoload['helper'] = array();
With this:
$autoload['helper'] = array('url');You can autoload additional libraries using the array() method and separate them by commas.
- To autoload the Database library, replace the following line:
- Press CTRL + X to save the file and Y to confirm the changes.
Create a Simple App with CodeIgniter
At this point in our CodeIgniter tutorial, you should have a running distribution of CodeIgniter. You should also know how models, views, and controllers work. Now, we are going to use the information to create a simple CodeIgniter web application.
The app is fairly simple. We'll use our model to fetch movie review grades from our database and display them one by one using our view. The controller will be used to route requests between the model and the view.
Once you get a grip on the fundamental process, you can go ahead and start building more rich web applications.
Step 1: Creating a phpMyAdmin Table
Below are the steps to create a table with phpMyAdmin. This table is essential because it forms the basis of our application.
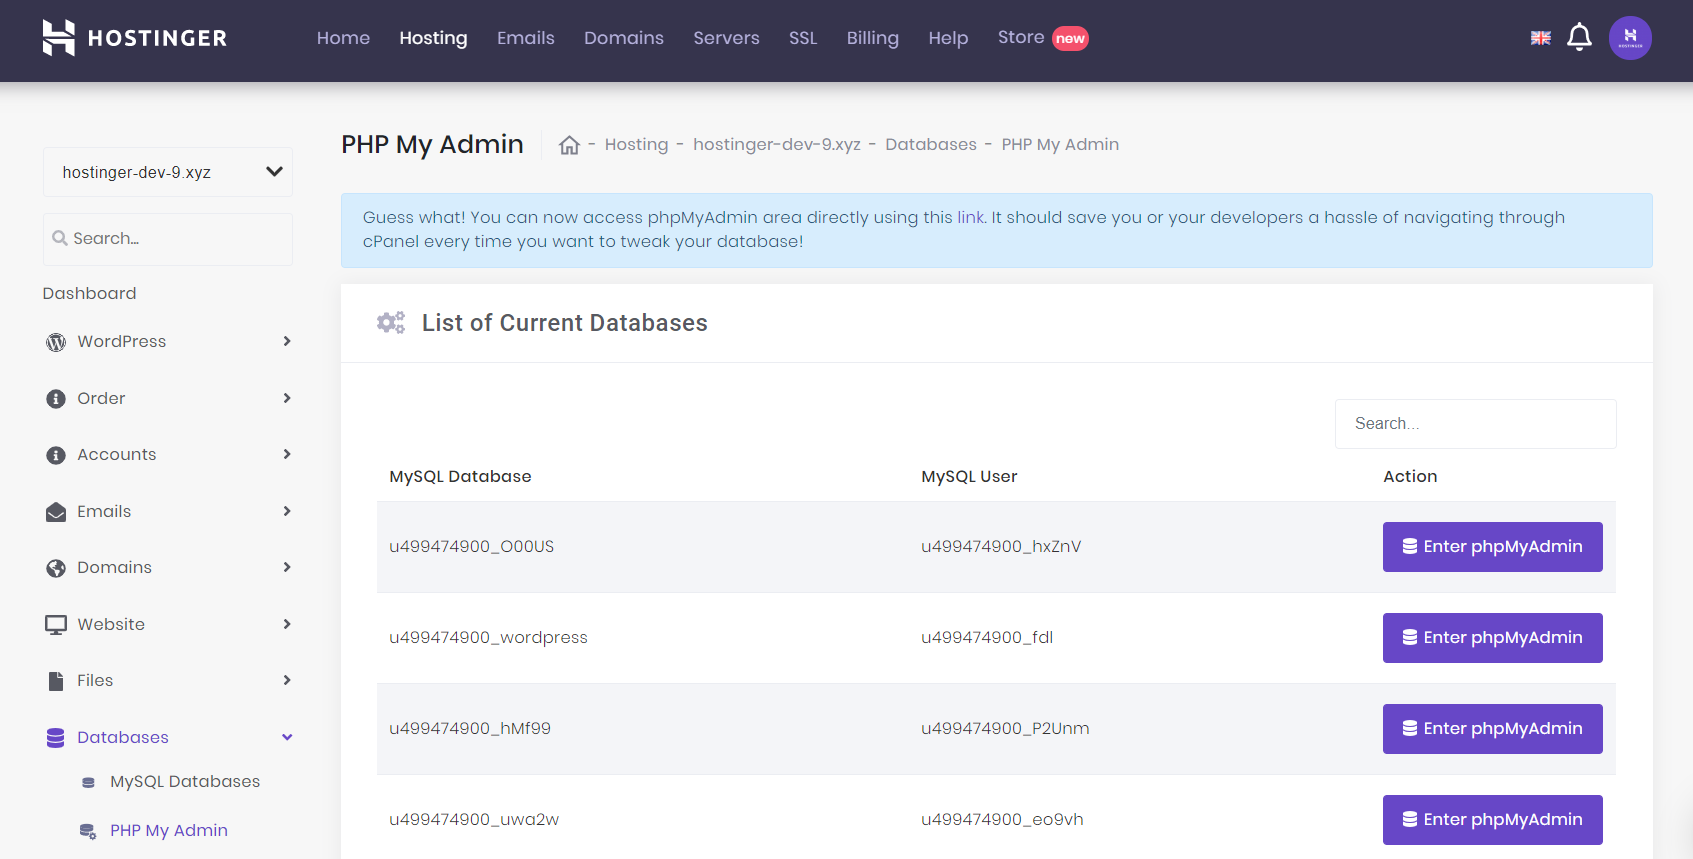
- Log in to your account. Navigate to the Databases section and select php MyAdmin.
- Look for the database that you have synced with CodeIgniter and hit Enter phpMyAdmin.
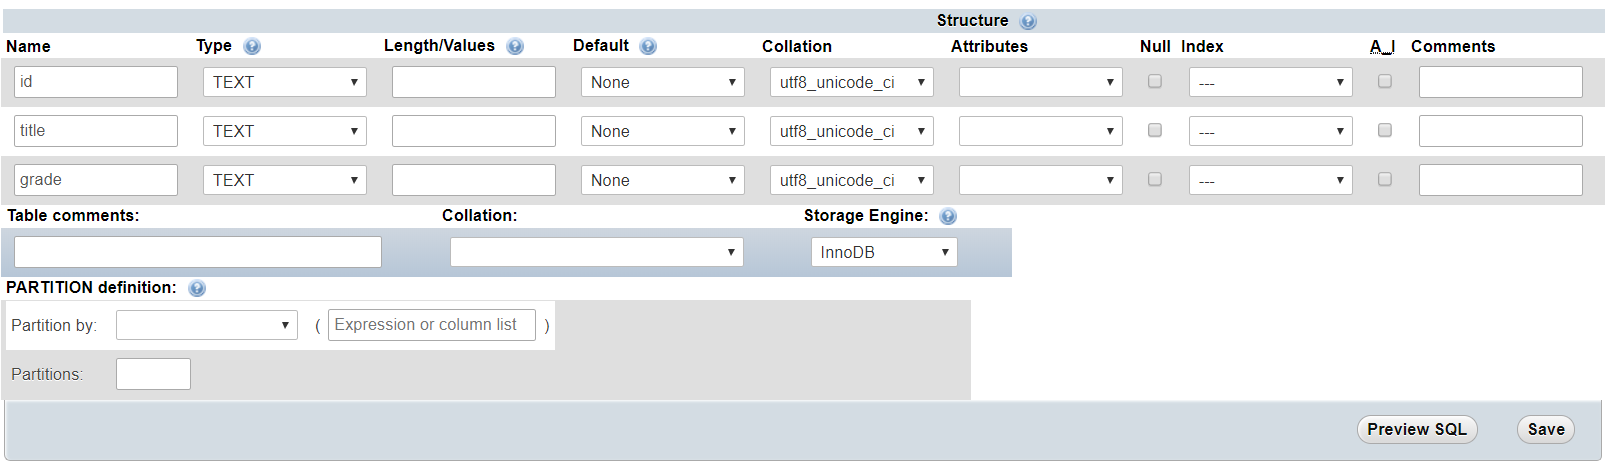
- Under the Create table menu, enter your table name and the number of columns. For our CodeIgniter tutorial, we'll name it reviews and use three columns. After that, select Go.

- The three columns are id, title, and grade. Fill other fields like our example below and hit Save.
Step 2: Creating The Model
Once the database table is sorted out, we can begin working on our business logic. To do this, we will create a model, which will get the values from the database.
- Log in to your account via SSH.
- Models are placed in the codeigniter/applications/models, so they don't mess with your application's directory structure. Hence, you need to go to that directory and create a new PHP file called R eviews_model.php:
cd codeigniter/applications/models
nano Reviews_model.php
- Paste the following code to the R eviews_model.php file:
<?php class News_model extends CI_Model { } ?>As you can see, your model class (News_model) extends the generic Cl_Model class that is provided by CodeIgniter. Note that CodeIgniter requires all class names to begin with a capital letter.
- We need to load the Database library that will help us work with databases. You can use the model's constructor method, which will load the library right from the start. To do this, paste the following code to the bottom of the R eviews_model.php file (below the class shown in step 3):
public function __construct() { $this->load->database(); }The Database library is now visible to all methods within the class.
- Create another method that will use the Database library to query the database:
public function get_reviews($id) { if($id != FALSE) { $query = $this->db->get_where('Reviews', array('id' => $id)); return $query->row_array(); } else { return FALSE; } }The code above will take in ID as an argument and returns all the information in the columns associated with that ID. In other words, this method will be called every time we request a movie review.
- Save the file by pressing CTRL + X and Y.
Step 3: Creating The Controller
We have taken care of our data retrieval layer. Next, our CodeIgniter tutorial will show you how to create a route using the controller. This way, when a user requests a movie review, our view is supplied with the information from the model.
- To create a new controller, go to the application/controllers directory and create a file named R eviews.php:
cd codeigniter/application/controller
nano Reviews.php
Remember, CodeIgniter's controllers require the file to have the same name as the class inside it.
- Paste the following code to the file:
<?php class Reviews extends CI_Controller { } ?> - Package the data that is retrieved from our model and pass it on the view. To achieve this, we will create a method called show(). It binds the data to the newly-created structure and loads the view. Here's how the code looks like:
public function show($id) { $this->load->model('Reviews_model'); $reviews = $this->RFrevieweviews_model->get_reviews($id); $data['title'] = $reviews['title']; $data['grade'] = $reviews['grade']; $this->load->view('Movie_review', $data); }The $data array is an associative array. The keys — title and grade — correspond to the values that are received from the database. This array is passed on to movie_review, and the view is subsequently loaded.
Step 4: Creating The View
Finally, we have to create a view that will display the requested movie reviews.
- Enter the application/views folder, and create a new file titled M ovie_review.php:
cd codeigniter/application/views nano Movie_reviews.php
Remember, the name of the file has to correspond to the view that you told the controller to load (last line of the show() method).
- Paste the following code and save the file:
<?php print $title; print $grade; ?>
Theviewwill display the information passed by the controller in the $dataarray. The results won't be very pretty since we haven't added styling to our view. However, you can add inline styling or reference a CSS stylesheet in the view later.
Our sample application is complete. You should be able to run this application by entering the following URL in your browser:
http://yourdomain.com/reviews/show/1
The web application will call the reviews' controllerwe created in Step 3, as well as calling the show() method with input parameter 1.
This parameter is used to fetch the database information about a movie with an ID of 1. As a result, you should see the title and grade of the first movie in the database.
Conclusion
CodeIgniter is a robust framework for PHP developers. With its MVC architecture, you can create a lightweight and feature-rich web application more efficiently. What's more, it also provides a wide array of libraries that will help you develop your product faster.
In this CodeIgniter tutorial, you have learned the fundamentals of this framework and why it is an essential tool for modern web development. Furthermore, we have shown you how MVC works and how you can create a simple application with CodeIgniter.
Now, let's try it yourself and good luck!

Domantas leads the content and SEO teams forward with fresh ideas and out of the box approaches. Armed with extensive SEO and marketing knowledge, he aims to spread the word of Hostinger to every corner of the world. During his free time, Domantas likes to hone his web development skills and travel to exotic places.
Source: https://www.hostinger.com/tutorials/codeigniter-tutorial
Posted by: ernestdopitae017605.blogspot.com

Posting Komentar untuk "Practical Codeigniter 3 Pdf Free Download"